从零搭建生产级 API 网关,一篇讲透微服务流量的“总开关”
在微服务架构中,API 网关是流量的“总开关”——所有外部请求都要从这里过。它既要负责路由转发,又得做限流熔断,还得搞定统一鉴权。如果网关挂了,整个系统就瘫痪了。所以网关选型和落地,一直是微服务架构设计中的关键决策。
目前,Spring Cloud Gateway 已经是 Spring Cloud 生态中事实上的标准网关方案。它基于 Spring WebFlux 和 Netty,完全异步非阻塞,性能远超 Zuul 1.x 的同步阻塞模型。Zuul 1.x 早已停止维护,Zuul 2.x 虽然也改成了异步非阻塞,但社区接受度始终不高。如果你的项目还在用 Zuul,现在正是迁移到 Spring Cloud Gateway 的时候。
本文将从零开始,搭建一个生产级的 Spring Cloud Gateway,涵盖动态路由、Redis 分布式限流、Resilience4j 熔断降级,以及基于 JWT 的统一鉴权——每一步都有可运行的代码和配置。
一、网关选型:为什么是 Spring Cloud Gateway?
在微服务架构中,网关承担着几个核心职责:
- 路由转发:根据请求路径、Header、参数等条件,将请求分发到对应的后端服务
- 限流降级:防止突发流量打垮后端服务,保障系统稳定性
- 统一鉴权:在网关层集中处理认证和权限校验,避免每个微服务都重复实现
- 跨域处理:统一配置 CORS,避免每个服务单独配置
Zuul 1.x 基于 Servlet 容器,是同步阻塞模型。每个请求占用一个线程,高并发下线程池很容易被打满。Spring Cloud Gateway 基于 Spring WebFlux 和 Netty,采用异步非阻塞模型,同样的硬件配置下 QPS 可以高出数倍。
现在另一个重要变化是:Spring Cloud Gateway 从 4.0.0 版本开始支持 Spring AOT 转换和 GraalVM Native Image。这意味着网关本身也可以编译成原生镜像,启动时间从秒级降到毫秒级——对于需要快速弹性扩容的网关层来说,这是一个非常实用的特性。
二、核心概念:路由、断言、过滤器
在动手写代码之前,先搞清楚 Spring Cloud Gateway 的三个核心概念。
路由(Route) 是网关最基本的配置单元,包含三部分:一个 ID、一个目标 URI、一组断言和过滤器。
断言(Predicate) 是路由的“匹配条件”。Gateway 内置了丰富的断言工厂——按路径匹配、按 Header 匹配、按请求参数匹配、按 Cookie 匹配、按时间匹配等。所有内置断言工厂的命名规范是 XxxRoutePredicateFactory,配置时只用 Xxx 部分即可。
过滤器(Filter) 在请求被路由前后执行,分为两种:GatewayFilter 作用于特定路由,GlobalFilter 作用于所有路由。Gateway 内置了数十个过滤器工厂——添加请求头、修改路径、重试、限流、熔断等。
整个请求处理的流程是:请求进入 Gateway → 匹配路由断言 → 执行前置过滤器链 → 转发到后端服务 → 执行后置过滤器链 → 返回响应。
三、基础搭建:从零创建 Gateway 服务
3.1 项目依赖
<?xml version="1.0" encoding="UTF-8"?>
<project xmlns="http://maven.apache.org/POM/4.0.0"
         xmlns:xsi="http://www.w3.org/2001/XMLSchema-instance"
         xsi:schemaLocation="http://maven.apache.org/POM/4.0.0
         https://maven.apache.org/xsd/maven-4.0.0.xsd">
    <modelVersion>4.0.0</modelVersion>

    <parent>
        <groupId>org.springframework.boot</groupId>
        <artifactId>spring-boot-starter-parent</artifactId>
        <version>3.5.16</version>
        <relativePath/>
    </parent>

    <groupId>com.example</groupId>
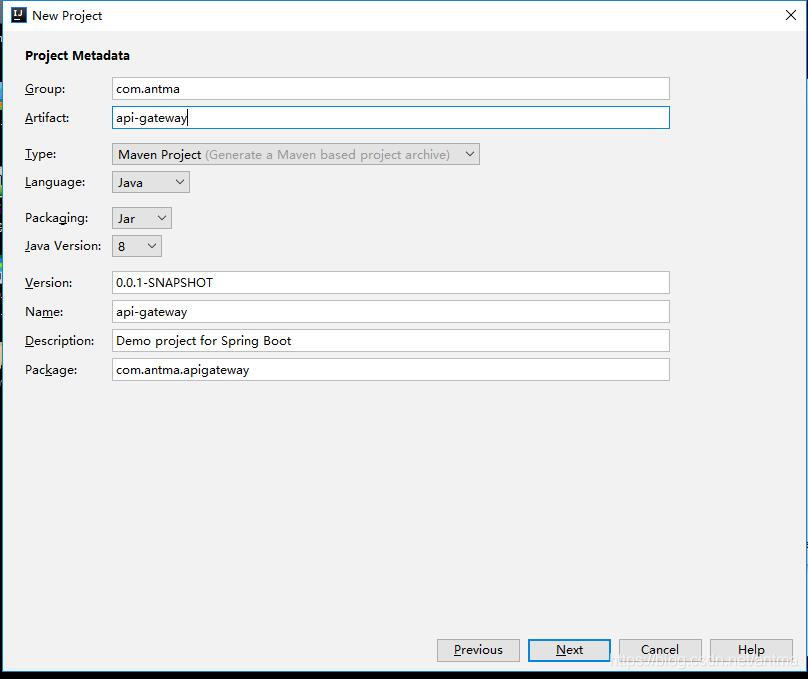
    <artifactId>api-gateway</artifactId>
    <version>1.0.0</version>

    <properties>
        <java.version>21</java.version>
        <spring-cloud.version>2025.0.1</spring-cloud.version>
    </properties>

    <dependencyManagement>
        <dependencies>
            <dependency>
                <groupId>org.springframework.cloud</groupId>
                <artifactId>spring-cloud-dependencies</artifactId>
                <version>${spring-cloud.version}</version>
                <type>pom</type>
                <scope>import</scope>
            </dependency>
        </dependencies>
    </dependencyManagement>

    <dependencies>
        <!-- Spring Cloud Gateway 核心依赖 -->
        <dependency>
            <groupId>org.springframework.cloud</groupId>
            <artifactId>spring-cloud-starter-gateway</artifactId>
        </dependency>

        <!-- 服务发现(Nacos) -->
        <dependency>
            <groupId>com.alibaba.cloud</groupId>
            <artifactId>spring-cloud-starter-alibaba-nacos-discovery</artifactId>
            <version>2023.0.1.0</version>
        </dependency>

        <!-- 限流需要 Redis -->
        <dependency>
            <groupId>org.springframework.boot</groupId>
            <artifactId>spring-boot-starter-data-redis-reactive</artifactId>
        </dependency>

        <!-- 熔断需要 Resilience4j -->
        <dependency>
            <groupId>org.springframework.cloud</groupId>
            <artifactId>spring-cloud-starter-circuitbreaker-reactor-resilience4j</artifactId>
        </dependency>

        <!-- JWT 解析 -->
        <dependency>
            <groupId>io.jsonwebtoken</groupId>
            <artifactId>jjwt-api</artifactId>
            <version>0.12.6</version>
        </dependency>
        <dependency>
            <groupId>io.jsonwebtoken</groupId>
            <artifactId>jjwt-impl</artifactId>
            <version>0.12.6</version>
            <scope>runtime</scope>
        </dependency>
        <dependency>
            <groupId>io.jsonwebtoken</groupId>
            <artifactId>jjwt-jackson</artifactId>
            <version>0.12.6</version>
            <scope>runtime</scope>
        </dependency>
    </dependencies>
</project>
3.2 基础配置
spring:
  application:
    name: api-gateway
  cloud:
    nacos:
      discovery:
        server-addr: localhost:8848
    gateway:
      # 开启服务发现路由(自动从注册中心获取服务实例)
      discovery:
        locator:
          enabled: true
          lower-case-service-id: true
      routes:
        # 路由1:用户服务
        - id: user-service-route
          uri: lb://user-service  # lb:// 表示从注册中心负载均衡获取
          predicates:
            - Path=/api/users/**
          filters:
            - StripPrefix=1
            - name: RequestRateLimiter
              args:
                key-resolver: "#{@ipKeyResolver}"
                redis-rate-limiter.replenishRate: 10
                redis-rate-limiter.burstCapacity: 20
        # 路由2:订单服务
        - id: order-service-route
          uri: lb://order-service
          predicates:
            - Path=/api/orders/**
          filters:
            - StripPrefix=1
        # 路由3:认证服务(无需鉴权)
        - id: auth-service-route
          uri: lb://auth-service
          predicates:
            - Path=/api/auth/**
          filters:
            - StripPrefix=1
上面的配置做了几件事:
- 开启
discovery.locator.enabled,Gateway 会自动从 Nacos 获取服务列表 - 使用
lb://协议,结合 Spring Cloud LoadBalancer 实现客户端负载均衡 - 用
Path断言匹配请求路径,StripPrefix=1去掉第一个路径段再转发 - 在用户服务路由上配置了
RequestRateLimiter限流过滤器
3.3 启动类
package com.example.gateway;

import org.springframework.boot.SpringApplication;
import org.springframework.boot.autoconfigure.SpringBootApplication;
import org.springframework.cloud.client.discovery.EnableDiscoveryClient;

@SpringBootApplication
@EnableDiscoveryClient
public class GatewayApplication {
    public static void main(String[] args) {
        SpringApplication.run(GatewayApplication.class, args);
    }
}
到这里,一个最基础的网关就已经跑起来了。接下来我们逐个深入各个核心功能。
四、路由断言:不止是路径匹配
Spring Cloud Gateway 内置了十多种路由断言工厂,覆盖了绝大多数生产场景。除了最常用的 Path,还有几个值得关注的:
时间断言:在指定时间之前或之后才生效,常用于灰度发布或定时切换。
predicates:
  - After=2026-08-01T00:00:00+08:00[Asia/Shanghai]
  - Before=2026-09-01T00:00:00+08:00[Asia/Shanghai]
  - Between=2026-08-01T00:00:00+08:00[Asia/Shanghai],2026-09-01T00:00:00+08:00[Asia/Shanghai]
Header 断言:根据请求头判断,比如用 X-User-VIP 头把 VIP 用户路由到更高配的服务实例。
predicates:
  - Header=X-User-VIP, true
Query 断言:根据请求参数判断。
predicates:
  - Query=version, v2
Weight 断言:按权重分配流量到不同路由,灰度发布利器。
predicates:
  - Weight=group1, 90  # 90% 流量
---
predicates:
  - Weight=group1, 10  # 10% 流量
自定义断言工厂
如果内置断言满足不了业务需求,可以自定义。比如实现一个根据用户 ID 尾号分配流量的断言:
package com.example.gateway.predicate;

import org.springframework.cloud.gateway.handler.predicate.AbstractRoutePredicateFactory;
import org.springframework.stereotype.Component;
import org.springframework.web.server.ServerWebExchange;

import java.util.Arrays;
import java.util.List;
import java.util.function.Predicate;

@Component
public class UserIdTailRoutePredicateFactory
        extends AbstractRoutePredicateFactory<UserIdTailRoutePredicateFactory.Config> {

    public UserIdTailRoutePredicateFactory() {
        super(Config.class);
    }

    @Override
    public List<String> shortcutFieldOrder() {
        return Arrays.asList("tails");
    }

    @Override
    public Predicate<ServerWebExchange> apply(Config config) {
        return exchange -> {
            // 从请求中获取用户 ID(从 Header 或 JWT 中解析)
            String userId = exchange.getRequest().getHeaders().getFirst("X-User-Id");
            if (userId == null || userId.isEmpty()) {
                return false;
            }
            char lastChar = userId.charAt(userId.length() - 1);
            return config.getTails().indexOf(lastChar) >= 0;
        };
    }

    public static class Config {
        private String tails;  // 例如 "01234"

        public String getTails() { return tails; }
        public void setTails(String tails) { this.tails = tails; }
    }
}
配置方式:
predicates:
  - UserIdTail=01234  # 用户 ID 尾号为 0-4 的走这个路由
五、限流:Redis 令牌桶实战
网关是流量的第一道防线。限流做不好,一个突发流量就能把后端服务打挂。
Spring Cloud Gateway 的 RequestRateLimiter 过滤器工厂,底层基于 Redis 实现令牌桶算法。它通过 Lua 脚本保证在分布式环境下判断和更新令牌数量的原子性。
5.1 限流 Key 解析器
限流的第一步是确定“按什么维度限流”——按用户 ID、按 IP、还是按接口?
package com.example.gateway.config;

import org.springframework.cloud.gateway.filter.ratelimit.KeyResolver;
import org.springframework.context.annotation.Bean;
import org.springframework.context.annotation.Configuration;
import reactor.core.publisher.Mono;

@Configuration
public class RateLimiterConfig {

    /**
     * 按 IP 限流
     */
    @Bean
    public KeyResolver ipKeyResolver() {
        return exchange -> {
            String ip = exchange.getRequest().getRemoteAddress().getAddress().getHostAddress();
            return Mono.just(ip);
        };
    }

    /**
     * 按用户 ID 限流(从请求头获取)
     */
    @Bean
    public KeyResolver userKeyResolver() {
        return exchange -> {
            String userId = exchange.getRequest().getHeaders().getFirst("X-User-Id");
            if (userId == null) {
                userId = "anonymous";
            }
            return Mono.just("user:" + userId);
        };
    }

    /**
     * 按接口路径限流(防止某个接口被刷)
     */
    @Bean
    public KeyResolver apiKeyResolver() {
        return exchange -> {
            String path = exchange.getRequest().getURI().getPath();
            return Mono.just("api:" + path);
        };
    }
}
5.2 路由级限流配置
在路由配置中指定使用哪个 KeyResolver 和限流参数:
filters:
  - name: RequestRateLimiter
    args:
      key-resolver: "#{@ipKeyResolver}"
      redis-rate-limiter.replenishRate: 10   # 每秒补充 10 个令牌
      redis-rate-limiter.burstCapacity: 20   # 令牌桶容量 20 个
replenishRate 是令牌补充速率,burstCapacity 是令牌桶容量。允许用户在 1 秒内消耗完所有令牌,也就是瞬时最高 QPS 可以达到 burstCapacity。
5.3 限流流程

5.4 动态限流配置
有些场景下,限流参数需要根据不同接口动态调整。可以通过自定义 RateLimiter 实现:
package com.example.gateway.config;

import org.springframework.cloud.gateway.filter.ratelimit.RedisRateLimiter;
import org.springframework.data.redis.core.ReactiveRedisTemplate;
import org.springframework.stereotype.Component;

@Component
public class DynamicRedisRateLimiter extends RedisRateLimiter {

    public DynamicRedisRateLimiter(ReactiveRedisTemplate<String, String> redisTemplate) {
        super(10, 20, redisTemplate);
    }

    @Override
    public Mono<Response> isAllowed(String routeId, String id) {
        // 从配置中心或数据库动态获取限流参数
        int replenishRate = getReplenishRate(routeId, id);
        int burstCapacity = getBurstCapacity(routeId, id);
        // 使用动态参数执行限流逻辑
        return super.isAllowed(routeId, id);
    }
}
六、熔断:Resilience4j 集成
限流是“超出流量不处理”,熔断是“后端挂了快速失败”。两者结合才能全面保护系统。
Spring Cloud Gateway 通过 CircuitBreakerGatewayFilterFactory 集成 Resilience4j。熔断器有三种状态:
- CLOSED(关闭):正常运行,所有请求放行
- OPEN(打开):熔断触发,所有请求快速失败
- HALF_OPEN(半开):允许少量请求通过,试探后端是否恢复
6.1 添加熔断配置
spring:
  cloud:
    gateway:
      routes:
        - id: user-service-route
          uri: lb://user-service
          predicates:
            - Path=/api/users/**
          filters:
            - StripPrefix=1
            - name: CircuitBreaker
              args:
                name: userServiceCircuitBreaker
                fallbackUri: forward:/fallback/user

resilience4j:
  circuitbreaker:
    instances:
      userServiceCircuitBreaker:
        failureRateThreshold: 50           # 失败率阈值 50%
        minimumNumberOfCalls: 10           # 最少请求数
        slidingWindowSize: 20              # 滑动窗口大小
        waitDurationInOpenState: 10s       # OPEN 状态持续时间
        permittedNumberOfCallsInHalfOpenState: 3
        automaticTransitionFromOpenToHalfOpenEnabled: true
6.2 降级处理
熔断触发后,需要返回一个友好的降级响应,而不是直接报错:
package com.example.gateway.controller;

import org.springframework.web.bind.annotation.GetMapping;
import org.springframework.web.bind.annotation.RestController;
import reactor.core.publisher.Mono;

import java.util.HashMap;
import java.util.Map;

@RestController
public class FallbackController {

    @GetMapping("/fallback/user")
    public Mono<Map<String, Object>> userFallback() {
        Map<String, Object> result = new HashMap<>();
        result.put("code", 503);
        result.put("message", "用户服务暂时不可用,请稍后重试");
        result.put("timestamp", System.currentTimeMillis());
        return Mono.just(result);
    }
}
6.3 重试 + 退避
除了熔断,还可以配置 Retry 过滤器,在网络抖动等临时故障时自动重试:
filters:
  - name: Retry
    args:
      retries: 3
      statuses: BAD_GATEWAY, SERVICE_UNAVAILABLE
      methods: GET
      series: SERVER_ERROR
      backoff:
        firstBackoff: 500ms
        maxBackoff: 5s
        factor: 2.0
七、统一鉴权:JWT 全局过滤器
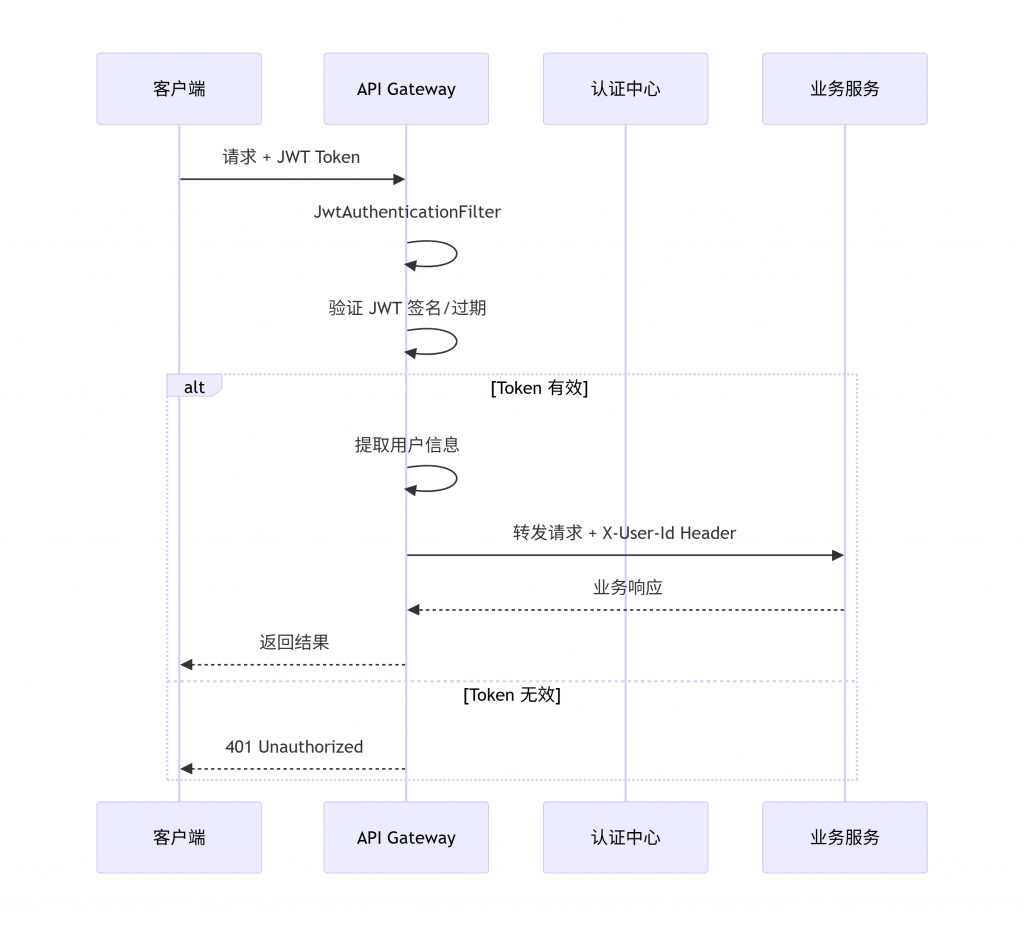
每个微服务都自己实现鉴权?那是重复造轮子。在网关层做统一鉴权,是微服务架构的标准实践。
7.1 全局过滤器实现
package com.example.gateway.filter;

import io.jsonwebtoken.Claims;
import io.jsonwebtoken.Jwts;
import io.jsonwebtoken.security.Keys;
import org.springframework.cloud.gateway.filter.GatewayFilterChain;
import org.springframework.cloud.gateway.filter.GlobalFilter;
import org.springframework.core.Ordered;
import org.springframework.http.HttpHeaders;
import org.springframework.http.HttpStatus;
import org.springframework.http.server.reactive.ServerHttpRequest;
import org.springframework.stereotype.Component;
import org.springframework.web.server.ServerWebExchange;
import reactor.core.publisher.Mono;

import javax.crypto.SecretKey;
import java.nio.charset.StandardCharsets;
import java.util.List;

@Component
public class JwtAuthenticationFilter implements GlobalFilter, Ordered {

    private static final String SECRET = "your-256-bit-secret-key-for-jwt-signing-in-production";
    private static final List<String> WHITE_LIST = List.of(
        "/api/auth/login",
        "/api/auth/register",
        "/actuator/health"
    );

    @Override
    public Mono<Void> filter(ServerWebExchange exchange, GatewayFilterChain chain) {
        ServerHttpRequest request = exchange.getRequest();
        String path = request.getURI().getPath();

        // 白名单直接放行
        if (isWhiteListed(path)) {
            return chain.filter(exchange);
        }

        // 获取 Authorization Header
        String authHeader = request.getHeaders().getFirst(HttpHeaders.AUTHORIZATION);
        if (authHeader == null || !authHeader.startsWith("Bearer ")) {
            exchange.getResponse().setStatusCode(HttpStatus.UNAUTHORIZED);
            return exchange.getResponse().setComplete();
        }

        String token = authHeader.substring(7);
        try {
            // 解析 JWT
            SecretKey key = Keys.hmacShaKeyFor(SECRET.getBytes(StandardCharsets.UTF_8));
            Claims claims = Jwts.parser()
                    .verifyWith(key)
                    .build()
                    .parseSignedClaims(token)
                    .getPayload();

            // 提取用户信息,放入请求头传递给下游服务
            String userId = claims.getSubject();
            String userRole = claims.get("role", String.class);

            ServerHttpRequest mutatedRequest = request.mutate()
                    .header("X-User-Id", userId)
                    .header("X-User-Role", userRole)
                    .build();

            return chain.filter(exchange.mutate().request(mutatedRequest).build());

        } catch (Exception e) {
            // Token 无效或过期
            exchange.getResponse().setStatusCode(HttpStatus.UNAUTHORIZED);
            return exchange.getResponse().setComplete();
        }
    }

    private boolean isWhiteListed(String path) {
        return WHITE_LIST.stream().anyMatch(path::startsWith);
    }

    @Override
    public int getOrder() {
        return -100;  // 优先执行
    }
}
7.2 鉴权流程
7.3 细粒度权限控制
有些接口需要特定的角色才能访问,可以在网关层做进一步的权限校验:
// 在 JwtAuthenticationFilter 中添加权限校验逻辑
private boolean hasPermission(String path, String role) {
    // 从配置中心或数据库读取路径-角色映射
    Map<String, List<String>> permissions = Map.of(
        "/api/admin/**", List.of("ADMIN"),
        "/api/orders/**", List.of("USER", "ADMIN")
    );
    return permissions.entrySet().stream()
        .filter(e -> path.matches(e.getKey().replace("**", ".*")))
        .anyMatch(e -> e.getValue().contains(role));
}
八、生产环境注意事项
1. 代理头安全
2026 年 Spring Cloud Gateway 修复了一个安全漏洞(CVE-2026-47825):Gateway 在某些配置下会转发来自不可信代理的 X-Forwarded-* 和 Forwarded 头。从 2026 年 6 月的修复版本开始,这些头默认被移除,除非显式配置 trusted-proxy 过滤器。如果你的 Gateway 部署在反向代理(如 Nginx)后面,需要显式配置受信代理:
spring:
  cloud:
    gateway:
      trusted-proxies: 10\.0\.0\..*|192\.168\..*
2. 超时配置
生产环境的网关应该明确定义超时、重试和降级行为,而不是依赖默认的 socket 行为:
spring:
  cloud:
    gateway:
      httpclient:
        connect-timeout: 2000
        response-timeout: 10s
      routes:
        - id: user-service-route
          uri: lb://user-service
          predicates:
            - Path=/api/users/**
          filters:
            - name: CircuitBreaker
              args:
                name: userServiceCircuitBreaker
3. Netty 调优
Gateway 底层基于 Netty,在高并发场景下需要调整 Netty 参数:
spring:
  cloud:
    gateway:
      httpclient:
        pool:
          max-connections: 200
          acquire-timeout: 45s
        connect-timeout: 2000
        response-timeout: 10s
4. AOT 和原生镜像支持
如果对启动时间有极致要求,可以考虑将 Gateway 编译成原生镜像。从 4.0.0 版本开始,Spring Cloud Gateway 支持 Spring AOT 转换和 GraalVM Native Image。如果使用负载均衡路由,需要显式定义 LoadBalancerClient 的服务 ID。
九、总结
API 网关是微服务架构的流量入口,选型和落地的质量直接影响整个系统的稳定性。
Spring Cloud Gateway 凭借异步非阻塞的架构、丰富的路由断言和过滤器生态、以及 目前对 AOT 和原生镜像的支持,已经成为 Spring Cloud 生态中网关方案的事实标准。本文从基础路由配置出发,逐步深入到限流、熔断、鉴权等生产级功能,每一块都有可运行的代码和配置。
在实际落地中,有几个核心原则值得记住:
- 限流要分层:网关层限流 + 服务层限流,双重防护
- 熔断要快:快速失败比长时间等待好,降级响应比报错好
- 鉴权要集中:在网关层统一处理,避免每个服务重复实现
- 配置要动态:路由、限流参数尽量支持动态刷新,避免改配置就要重启
网关是微服务架构的“守门人”,值得花足够的时间把它打磨好。
系列拓展阅读
- 《Spring Security 6 + JWT + OAuth2 实战:从零构建安全认证中心》 —— 网关统一鉴权的认证中心配套方案
- 《Spring Boot 微服务间调用最佳实践:从 OpenFeign 到 HttpExchange + 服务治理》 —— 网关下游的微服务调用实践
- 《从 Docker 到 K8s:Spring Boot 应用部署与自动伸缩实战》 —— 网关在 Kubernetes 中的部署
- 《Java 应用全链路追踪实战:OpenTelemetry + Jaeger 从入门到生产》 —— 网关层的链路追踪集成
参考文献
- Spring Cloud Gateway Reference Documentation. https://docs.spring.io/spring-cloud-gateway/reference/
- Spring Cloud Gateway Release Notes. HeroDevs Docs.
- “Spring Cloud Gateway 路由断言工厂全解析.” 博客园, 2026.
- “Spring Cloud Gateway RequestRateLimiter 实战:Redis 令牌桶限流.” CSDN, 2026.
- “Spring Cloud Gateway 限流熔断机制深度解析.” OSC, 2026.
- “JWT + Spring Cloud Gateway 鉴权完整落地方案.” CSDN, 2026.
- “Spring Cloud Gateway 生产级实践:高可用架构、灰度发布与故障排查.” CSDN, 2026.
- “Spring Cloud Gateway 高性能网关实战指南.” OSC, 2026.
- “毫秒级响应 API 网关技术选型与压测实战.” OSC, 2026.
- Spring Cloud 2025.1.2 (Oakwood) Release Notes. Spring.io, 2026.