从原理到实战,把 Spring Boot 应用编译成毫秒级启动的原生可执行文件
早上九点,你端着咖啡坐到工位,按下 Run 键,然后去倒杯水、刷两个短视频、跟同事聊几句——回来一看,Spring Boot 还在打印 Banner,Tomcat 还没初始化完。这个场景是不是似曾相识?
在云原生时代,这个问题变得更加致命。Kubernetes Pod 弹性扩容时需要秒级启动,Serverless 函数的冷启动超时限制往往只有几秒钟,而一个典型的 Spring Boot 应用启动需要 3-8 秒。云厂商按秒计费,用户按秒流失——启动慢已经不只是开发体验问题,而是真金白银的成本问题。
好消息是,2025 年 5 月 22 日 Spring Boot 3.5.0 正式发布,GraalVM 原生镜像(Native Image)在 Spring Boot 3.x 中已成为一等公民。Spring Boot 3.5 对 GraalVM 提供了全面支持,通过 Spring AOT 引擎在构建时完成 Bean 定义解析和代理类生成。本文将带你从零开始,把一个 Spring Boot 3.5 应用编译成原生可执行文件,并深入剖析背后的技术原理。
一、JIT vs AOT:一场关于“时间”的哲学博弈
要理解原生镜像的价值,得先搞清楚 Java 应用为什么“慢”。
1.1 JIT 编译:随性的米其林大厨
传统的 Java 运行模式(HotSpot VM)采用的是 JIT(Just-In-Time,即时编译) 。你可以把它想象成一个米其林大厨——你给他菜谱(字节码 .class),他不会马上做全套。他先随便炒两下让你吃上(解释执行),同时观察你的口味偏好,等摸清楚了,再开始精心烹饪(JIT 编译优化)。
这套机制在长运行的应用中效果极好——经过足够的“预热”,JIT 编译出来的机器码性能甚至能超过 C++。但代价是:冷启动慢。应用启动时,类加载、字节码验证、JIT 编译、Spring 容器的反射扫描……一系列操作堆在一起,启动时间轻松破秒。
1.2 AOT 编译:提前准备好的预制菜
AOT(Ahead-of-Time,提前编译) 走的是另一条路——在构建阶段就把一切准备好。Spring AOT 在构建时分析代码,生成优化版本。它做的事情包括:
- Bean 定义提前解析:在构建时生成 Bean 的实例化代码,运行时直接执行,无需反射扫描
- 条件评估提前完成:
@Conditional等条件在构建时就评估完,运行时不再重复判断 - 反射配置自动生成:为 GraalVM 生成所需的
reflect-config.json等配置文件
GraalVM Native Image 在此基础上更进一步——它执行静态分析,识别应用运行时可能使用的所有类、方法和字段,将它们连同 Substrate VM(一个精简的运行时环境)一起编译成针对特定操作系统的原生可执行文件。
1.3 性能差距有多大?
| 指标 | 传统 JVM(Spring Boot 2.x) | GraalVM 原生镜像(Spring Boot 3.5) |
|---|---|---|
| 启动时间 | 3-8 秒 | 50-200ms |
| 内存占用 | 200-500MB | 50-100MB |
| 部署方式 | JAR + JVM | 单文件可执行文件 |
| 预热需求 | 需要 JIT 预热 | 无需预热,启动即峰值 |
有实测数据显示,一个典型的 Spring Boot 应用迁移到原生镜像后,启动时间从 4.2 秒降至约 0.05 秒,基础内存占用从 285MB 降至 89MB。在 Kubernetes 环境中,这意味着 Pod 扩容时间从秒级变成毫秒级。
二、实战:从零构建 Spring Boot 3.5 原生镜像
2.1 环境准备
在开始之前,确保你的环境满足以下要求:
| 组件 | 版本要求 |
|---|---|
| JDK | GraalVM for JDK 17 或 21(不是 OpenJDK) |
| Spring Boot | 3.5.x |
| Maven | 3.8.2 或更高 |
| 操作系统 | Windows 11 / Linux / macOS |
安装 GraalVM:
# 1. 下载 GraalVM(以 JDK 21 为例)
# 访问 https://www.graalvm.org/downloads/ 下载对应版本

# 2. 解压并设置环境变量(Linux/macOS)
export GRAALVM_HOME=/path/to/graalvm-jdk-21
export PATH=$GRAALVM_HOME/bin:$PATH

# 3. 安装 native-image 工具(关键步骤!)
gu install native-image

# 4. 验证安装
java -version
# 应该显示 GraalVM 相关信息
native-image --version
Windows 用户注意:除了 GraalVM,你还需要安装 Visual Studio Build Tools(含 C++ 开发工具),因为原生镜像编译需要本地链接器。
2.2 创建 Spring Boot 3.5 项目
使用 Spring Initializr 创建一个新项目,或者基于现有的 Spring Boot 3.5 项目改造。以下是 pom.xml 的核心配置:
<?xml version="1.0" encoding="UTF-8"?>
<project xmlns="http://maven.apache.org/POM/4.0.0"
         xmlns:xsi="http://www.w3.org/2001/XMLSchema-instance"
         xsi:schemaLocation="http://maven.apache.org/POM/4.0.0
         https://maven.apache.org/xsd/maven-4.0.0.xsd">
    <modelVersion>4.0.0</modelVersion>

    <parent>
        <groupId>org.springframework.boot</groupId>
        <artifactId>spring-boot-starter-parent</artifactId>
        <version>3.5.16</version>  <!-- Spring Boot 3.5.x 最新版本 -->
        <relativePath/>
    </parent>

    <groupId>com.example</groupId>
    <artifactId>native-demo</artifactId>
    <version>1.0.0</version>

    <properties>
        <java.version>21</java.version>
        <maven.compiler.source>21</maven.compiler.source>
        <maven.compiler.target>21</maven.compiler.target>
    </properties>

    <dependencies>
        <!-- Spring Boot Web -->
        <dependency>
            <groupId>org.springframework.boot</groupId>
            <artifactId>spring-boot-starter-web</artifactId>
        </dependency>

        <!-- 可选:添加你需要的其他依赖 -->
    </dependencies>

    <build>
        <plugins>
            <!-- Spring Boot Maven 插件 -->
            <plugin>
                <groupId>org.springframework.boot</groupId>
                <artifactId>spring-boot-maven-plugin</artifactId>
            </plugin>
        </plugins>
    </build>

    <!-- 使用 profile 隔离 native 配置,避免影响普通构建 -->
    <profiles>
        <profile>
            <id>native</id>
            <build>
                <plugins>
                    <!-- GraalVM Native Build Tools 插件 -->
                    <plugin>
                        <groupId>org.graalvm.buildtools</groupId>
                        <artifactId>native-maven-plugin</artifactId>
                        <configuration>
                            <mainClass>com.example.NativeDemoApplication</mainClass>
                            <!-- 可选:构建时传递给 native-image 的参数 -->
                            <buildArgs>
                                <buildArg>--no-fallback</buildArg>
                                <buildArg>-H:+ReportExceptionStackTraces</buildArg>
                            </buildArgs>
                        </configuration>
                        <executions>
                            <execution>
                                <id>build-native</id>
                                <goals>
                                    <goal>compile</goal>
                                </goals>
                                <phase>package</phase>
                            </execution>
                        </executions>
                    </plugin>
                </plugins>
            </build>
        </profile>
    </profiles>
</project>关键配置说明:
- 将 native 配置放在
<profile>中,默认构建(mvn clean package)不受影响native-maven-plugin会自动触发 Spring AOT 处理- 构建原生镜像时使用
mvn -Pnative native:compile
2.3 编写一个简单的 Controller
package com.example;

import org.springframework.boot.SpringApplication;
import org.springframework.boot.autoconfigure.SpringBootApplication;
import org.springframework.web.bind.annotation.GetMapping;
import org.springframework.web.bind.annotation.RestController;

import java.time.Instant;
import java.util.HashMap;
import java.util.Map;

@SpringBootApplication
@RestController
public class NativeDemoApplication {

    public static void main(String[] args) {
        SpringApplication.run(NativeDemoApplication.class, args);
    }

    /**
     * 测试接口 - 返回启动时间和当前时间
     * 用于验证原生镜像的启动速度
     */
    @GetMapping("/api/hello")
    public Map<String, Object> hello() {
        Map<String, Object> response = new HashMap<>();
        response.put("message", "Hello from GraalVM Native Image!");
        response.put("timestamp", Instant.now().toString());
        // 获取进程启动时间(用于验证启动速度)
        response.put("uptime", ManagementFactory.getRuntimeMXBean().getUptime());
        return response;
    }
}
2.4 构建原生镜像
# 1. 先执行普通打包(生成 JAR)
mvn clean package

# 2. 使用 native profile 构建原生镜像
mvn -Pnative native:compile

# 构建过程可能需要 3-10 分钟,取决于项目大小
# 构建产物位于 target/ 目录下,文件名为 {artifactId}构建流程图:
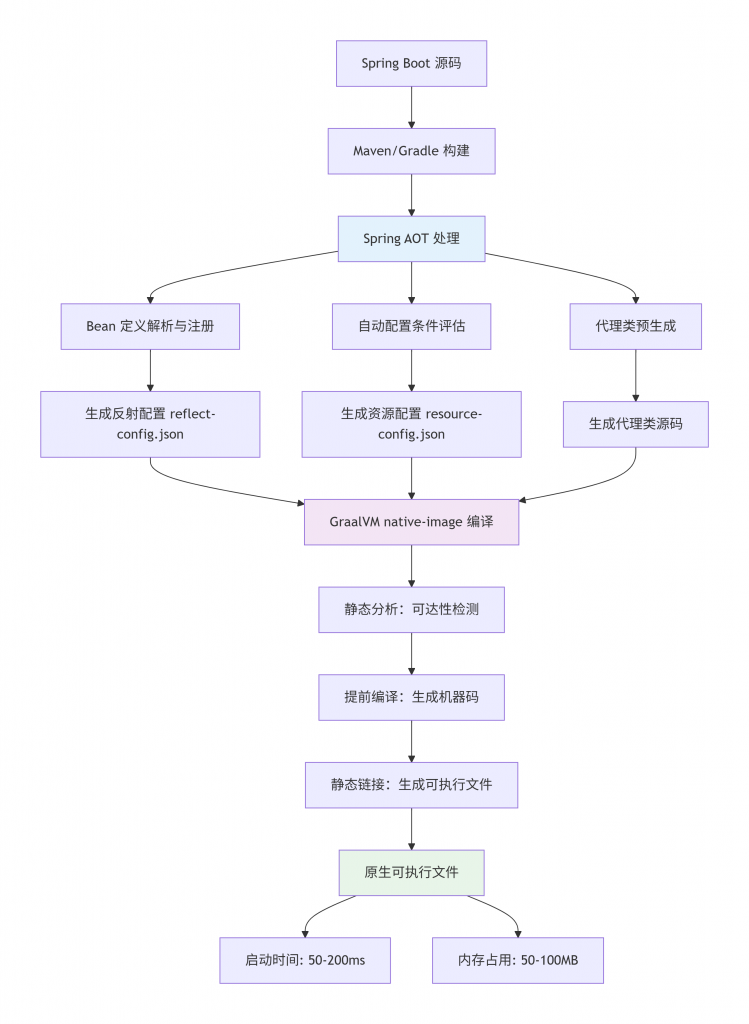
2.5 运行并验证
# 运行原生镜像(直接执行,不需要 java -jar)
./target/native-demo

# 你应该看到类似这样的输出:
# Starting NativeDemoApplication using Java 21 with PID 12345 ...
# Started NativeDemoApplication in 0.089 seconds (JVM running for 0.092)

# 测试接口
curl http://localhost:8080/api/hello
# 返回: {"message":"Hello from GraalVM Native Image!","timestamp":"2026-07-29T...","uptime":89}
启动时间 0.089 秒——不到 100 毫秒。同样的代码在传统 JVM 上需要 2-3 秒。这就是 AOT + 原生镜像带来的质变。
三、避坑指南:反射、代理与资源文件
在普通的 JVM 上运行良好的代码,到了 Native Image 可能会“翻车”。主要原因在于 GraalVM 的静态分析——它需要在编译时知道所有代码调用路径。
3.1 反射(Reflection)
Spring 框架大量使用反射进行依赖注入、数据绑定等操作。好消息是,Spring AOT 会自动处理大部分反射配置——它会分析你的 Spring 组件,自动生成 GraalVM 所需的 reflect-config.json。
但对于你自己编写的、Spring 框架未管理的复杂反射代码,需要手动配置。
方式一:使用 RuntimeHints(推荐)
package com.example.config;

import org.springframework.aot.hint.RuntimeHints;
import org.springframework.aot.hint.RuntimeHintsRegistrar;
import org.springframework.context.annotation.Configuration;
import org.springframework.context.annotation.ImportRuntimeHints;

/**
 * 为 GraalVM 原生镜像提供反射提示
 * Spring Boot 3.x 推荐的声明式配置方式
 */
@Configuration
@ImportRuntimeHints(MyRuntimeHints.class)
public class NativeConfig {
}

class MyRuntimeHints implements RuntimeHintsRegistrar {
    @Override
    public void registerHints(RuntimeHints hints, ClassLoader classLoader) {
        // 为 MyDynamicClass 及其所有字段、方法启用反射
        hints.reflection()
            .registerType(MyDynamicClass.class,
                hint -> hint.withMembers(
                    MemberCategory.INVOKE_DECLARED_CONSTRUCTORS,
                    MemberCategory.INVOKE_DECLARED_METHODS,
                    MemberCategory.DECLARED_FIELDS
                ));

        // 为特定方法注册反射
        hints.reflection()
            .registerMethod(
                MyService.class.getMethod("process", String.class),
                ExecutableMode.INVOKE
            );
    }
}
方式二:JSON 配置文件(传统方式)
将 reflect-config.json 放在 src/main/resources/META-INF/native-image/ 目录下:
[
  {
    "name": "com.example.MyDynamicClass",
    "allDeclaredMethods": true,
    "allDeclaredFields": true,
    "allPublicConstructors": true
  }
]
3.2 资源文件
如果代码中通过 Class.getResource() 或 ClassLoader.getResource() 加载资源文件,也需要显式声明:
{
  "resources": {
    "includes": [
      {"pattern": "\\Qconfig/myapp.properties\\E"},
      {"pattern": "templates/.*\\.html"}
    ]
  }
}
3.3 动态代理
CGLIB 动态代理在原生镜像中受限——Spring AOT 会自动处理大部分代理场景。但如果使用了自定义的 Proxy.newProxyInstance(),需要显式配置:
// 使用 RuntimeHints 注册动态代理
hints.proxies()
    .registerJdkProxy(MyInterface.class, AnotherInterface.class);
3.4 常见问题速查表
| 问题类型 | 症状 | 解决方案 |
|---|---|---|
| 反射 | ClassNotFoundException 或 NoSuchMethodException | 使用 RuntimeHints 注册类/方法 |
| 资源文件 | 文件找不到(FileNotFoundException) | 在 resource-config.json 中声明 |
| 动态代理 | 代理类创建失败 | 使用 RuntimeHints 注册代理接口 |
| 类初始化 | 构建时初始化异常 | 使用 --initialize-at-run-time 参数 |
四、两种构建方式:Buildpacks vs Native Build Tools
Spring Boot 官方文档说明,将可执行 JAR 转换为原生镜像主要有两种方式:
| 对比维度 | Cloud Native Buildpacks | Native Build Tools(native-maven-plugin) |
|---|---|---|
| 命令 | mvn spring-boot:build-image -Pnative | mvn -Pnative native:compile |
| 是否需要本地 GraalVM | ❌ 不需要(使用 Paketo Builder) | ✅ 必须安装 GraalVM |
| 是否需要 Docker | ✅ 必须 | ❌ 不需要 |
| 构建速度 | 较慢(每次拉取 Builder 镜像) | 较快(利用本地缓存) |
| 可控性 | 较低(黑盒构建) | 较高(完全可控) |
| CI/CD 友好度 | 一般(需要 Docker 环境) | 高(只需 GraalVM) |
选型建议:
- 本地快速验证 → Native Build Tools(
mvn -Pnative native:compile) - 生产 CI/CD → 两者皆可,根据团队基础设施选择
- 不想折腾 GraalVM 安装 → Buildpacks(前提是有 Docker)
五、技术选型:什么时候该用原生镜像?
原生镜像并非万能药。在决定是否采用之前,需要权衡利弊:
✅ 适合使用原生镜像的场景
| 场景 | 原因 |
|---|---|
| Serverless / FaaS | 冷启动限制严格,毫秒级启动是刚需 |
| Kubernetes 弹性扩容 | Pod 启动快,扩容响应及时 |
| CLI 工具 | 单文件分发,无需安装 JVM |
| 边缘计算 / IoT | 资源受限环境,内存占用是关键 |
| 短生命周期任务 | 批处理、定时任务,启动时间占比高 |
❌ 不适合使用原生镜像的场景
| 场景 | 原因 |
|---|---|
| 大量反射/动态代理 | 配置复杂,维护成本高 |
| 运行时动态加载类 | 封闭世界假设不支持 |
| 对构建时间敏感 | Native Image 构建需要 3-10 分钟 |
| 依赖大量第三方库 | 第三方库的反射问题需要逐一排查 |
| 需要 JVM 特定特性 | 如 JMX、JVM TI 等 |
选型决策树
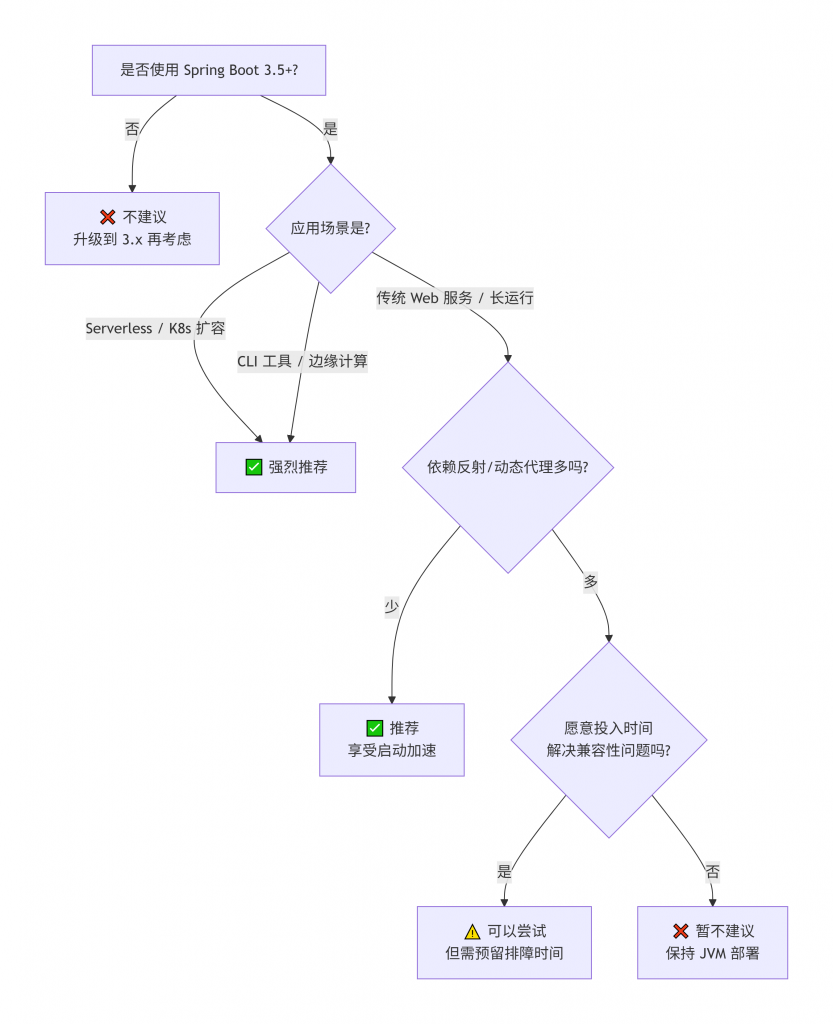
核心建议:原生镜像最适合短生命周期、对启动速度敏感的应用。对于长时间运行的传统 Web 服务,JVM 的 JIT 优化在运行一段时间后性能可能反而更优——启动速度不是唯一的衡量标准。六、总结
Spring Boot 3.5 + GraalVM 原生镜像代表了 Java 在云原生时代的一个重要演进方向。通过 Spring AOT 引擎在构建时完成 Bean 定义解析和代理类生成,将原本在运行时的开销前置到构建阶段,实现了:
- 启动时间:从 3-8 秒降至 50-200ms
- 内存占用:从 200-500MB 降至 50-100MB
- 部署方式:从 JAR + JVM 变为单文件可执行文件
但这条路上也有坑——反射、动态代理、资源加载都需要额外配置。好在 Spring Boot 3.5 的 AOT 引擎已经能自动处理大部分场景,大大降低了接入门槛。
2026 年的今天,GraalVM 原生镜像已经在 Spring Boot 3.5 中成为一等公民。对于 Serverless、Kubernetes 弹性扩容、CLI 工具等场景,原生镜像带来的启动速度和内存优势是传统 JVM 部署无法比拟的。如果你正被“启动慢、内存大”的问题困扰,不妨花一个下午把项目跑通原生镜像——那 0.1 秒的启动速度,值得你折腾一次。
系列拓展阅读
- 《WSL2 + Docker Desktop:Windows 下的完美 Java 开发环境》 —— 原生镜像编译的环境基石
- 《Spring Boot 3.4 Docker 镜像最佳实践(含分层构建)》 —— 容器化部署的另一种优化思路
- 《从 Docker 到 K8s:Spring Boot 应用部署与自动伸缩实战》 —— 原生镜像在 Kubernetes 中的部署
- 《Java 17 → 21 → 25:生产环境 JDK 升级实战》 —— GraalVM 基于 JDK 21,升级是前提
参考文献
- Spring Boot Reference Documentation. “Ahead-of-Time Processing.” https://docs.spring.io/spring-boot//3.5/gradle-plugin/aot.html
- Spring Boot Reference Documentation. “GraalVM Native Image Support.” https://docs.spring.io/spring-boot/docs/3.5.x/reference/html/native-image.html
- GraalVM Native Build Tools Documentation. https://graalvm.github.io/native-build-tools/
- runebook.dev. “从 JVM 到原生:Spring Boot Native Image 常见问题及替代方案.” https://runebook.dev/zh/docs/spring_boot/native-image/native-image.introducing-graalvm-native-images
- “Spring Boot 3 与 GraalVM 原生镜像:从 JIT 到 AOT 的启动革命.” CSDN, 2026.
- “Spring Boot 3.5正式普及!Java虚拟线程+GraalVM原生镜像,启动仅0.3秒.” CSDN, 2026.
- “Spring Boot 3 + GraalVM 25 实战:基于 Windows 11 系统编译原生镜像.” CSDN, 2025.
- “Spring Boot 3.5.3 Benchmark: Web, Reactive, CDS, AOT, Virtual Threads, JVM, and Native.” ITNEXT, 2026.